Tuesday, March 30, 2010

Cookies for Gabby

Last week, a friend from my playgroup, asked me to make some cookies for her daughter's naming ceremony. She asked that the cookies have the design and colors similar to the dress that Gabby would be wearing. Gabby's dress was this beautiful purple color and I must say it was fun having a base icing on the cookies that wasn't white.

I have to say sorry now, as my pictures are not the best. Don't know really what was going on, but I couldn't get a good shot to save my life that day.


Tools of the trade. Whoever thought up food coloring makers was a genius. They came in very handy when decorating these cookies.


A clean slate ready to be decorated.


I started off by doing the outline of the design. I tried to work one color at a time to make myself more efficient. Don't really know if I accomplished this or not since this was the first time I was doing these and I had given myself plenty of time before the shipping deadline (I'm good like that).


The yellow center is added.


It's a shame I'm such a bad photographer and that I couldn't get a true picture of the colors on the cookie. Here I added the purple touches to the cookie.


And to finish off the cookie, the green leaf is added and the flower is colored in blue. After all the cookies were decorated, they were shipped off to Arizona for the ceremony. Happily they made it there with only a few causalities which quickly became quality control tests.

Tuesday, March 23, 2010

Can you Show me How to Get...

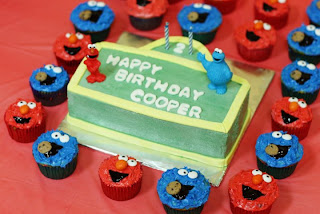
So here is the post I should have posted before my last post, but was so busy making goodies for my last post that I forgot to post it. Make sense? Anyway, this is the cake I made for my friend Gina's son Cooper. He turned two in early March. Gina had decided to go with a Sesame Street theme and asked me to make Cooper's cake. Gina was making some Sesame Street character cupcakes and wanted the street sign as the birthday cake.


Here is the finished product. I iced the cake with buttercream and then used marshmallow fondant for the lettering and the outline of the cake. I was hoping for a darker green, but didn't want to kill the icing with food coloring.


I ready liked how the yellow fondant curved on the bottom of the cake here.

Here is the cake at the party. I love the cupcakes Gina made and I think the birthday cake looked great with them.


I added this picture to show that I almost had a cake wreck on my hands. Can you see the problem, I'll give you a minute...

Yep, I spelled Cooper's name wrong. Thankfully, my husband came home and pointed out my mistake and I was able to fix my error. I was mortified that I did this, and yes Gina did see this picture as I sent it over to see if she wanted me to change anything with the cake. Right after I sent her the picture, I sent another message about the blunder and sincere apologizes. Still a little mortified that I did this. I'm just so glad the cake was fixed before the birthday boy got to enjoy it and his party.

Monday, March 15, 2010

The Big 40

So this was it, the year of the big 40. That's my age now, and I'm fine with that. Hey with a number like that, a big party was in order, and a big party we had. And of course no party is complete without a dessert table right? I started making goodies for my table on Sunday, and finished Thursday night around 10:30. I was very busy last week with the making of treats and my oldest daughter's class field trip that we went on together. That would be why I didn't get a chance to post last week. That amd I cpmpletely forgot to. And of course I had something to show you all. Oh well, I'll have to hold that for another day. As for my dessert table, I got a little carried away, like always, and some things came out exactly how I wanted them, and others did not. But all in all, I loved how my table turned out and everyone enjoy the treats. Below you will find pictures of the table in all it's glory and individual shots of all the goodies my guests had to choose from. Enjoy, we sure did!


I used the colors of pink, green, brown and red (all colors on the invitation sent out) to create and decorate the treats and table. And before you think I did all of this on my own, I did not. I had help from my husband and two great friends.

Here is my birthday cake, and yes I did make my own birthday cake. Sounds crazy I know, but I like my cakes, so why should we pay someone else. Now I will admit, at first I hated my cake. You see it didn't look like this in the beginning. I redid two of the layers because I hated them so much. Also, I am my own worst critic. The problem is I get a vision of what I want in my head, and then when that vision doesn't come close (and in this case, anywhere close), I start to not like my work. After reworking the layers, I liked my cake and it got to show itself off on the table. There are still some things I would have done differently, but I was overall pretty happy with it. The K on the second layer is actually fondant that I shaped and then brushed with a red metallic dust. It was suppose to sit on the top of the cake, but ended up being to heavy to do so.


These are the famous cake pops. If you are friends with me on Facebook, you may have seen a lot of banter and posting over these guys. People just love when I make them. I wasn't sure how to put these on display until my friend and I went to JoAnn Fabrics to buy supplies for the table. What we came up with was cutting a big styrofoam ball in half, painting it with chocolate and then pressing some floral grass (I'm not really sure what it's called) on it to make a base to stick the cake pops into. I was really pleased how they turned out and saved the half balls to use again(since I'm sure friends will always be requesting cake pops).

These are my favorite. Chocolate dipped coconut macaroons. I have made these for years now, and I love them every time. In fact, it's probably a good thing that they are a bit of a pain to make, because if they were easy I would be eating them all then time. And then my waistline would disappear.


I thought it would be nice to have some chocolate dipped pretzels just to give the table some height and color. You can get much easier then these guys and I really liked how they turned out.

Good old brownie bites with buttercream icing.

These are my Mom's dainty almond tea cookies that we usually only have at Christmas time. I made them to give a non chocolate option to my guest, and to add a little red to the table.

Believe it or not, these guys were suppose to be fortune cookies. I had my batter all ready and the fortunes printed out ready to hide in the cookies. My friend Cecilia came over to help make them since we would only be able to make a few at a time and I wanted about 50 cookies. We did many attempts, probably about 5 times or roughly 15 cookies. They tasted great, but just weren't working. So plan B went into effect. I piped out the cookies, baked them off, dipped them in dark chocolate and Cecilia sprinkled them with the pink sugar I had gotten for the fortune cookies. For a failed cookie, these were definitely one of the favorites of the night. Basically the cookie batter is a chocolate tuile that I added a little almond extract and orange zest too. These are a keeper for sure.

Here is another dessert that didn't quite turned out the way I was hoping it would. My Father-in-law had brought over some cream cheese earlier in the week, and one of the containers was a mixed berry flavor. I figured with that. I could make little cheesecakes, but when I went shopping for last minute ingredients that I needed, I forget to get the Cool Whip (I was making a no bake recipe). I did have some Cool Whip, just not enough for what the recipe called for. I went ahead and made them anyway, because once again, I wanted to give a non chocolate option. I wasn't going to use them, but after my 2 taste testers (my husband Jeff and friend Cecilia) tried them and liked them, they were dressed up with some strawberries and made the table.

These chocolate truffles were my third and final dessert that didn't come out as I wanted, but tasted too, too good not to use. My ganache was just a little too soft and even though the truffles were rolled in cocoa twice, they came out with a marble look to them. Still tasty and still enjoyed by the party goers.

Me with my table. Looking forward to my next dessert table now. :)

Tuesday, March 2, 2010

What's Been Going On.

So I have been meaning to post these next pictures for almost two weeks now. One picture is from the Valentine's Day party that my oldest had at her school, and the other pictures are from the Fat Tuesday fest I had with some friends. I really did mean to blog about them, but other posts got in their way. What can I say, sometimes I have too much for the week, and other times (like today) I haven't got squat. I figure today was better late then never for these guys, so here they are for your viewing pleasure.

First up, the Fat Tuesday fest of little desserts.


This is a Donut Muffin. These are super simple and pretty tasty. I covered mine in cinnamon sugar, but I'm thinking you could also roll them in powdered sugar, or cover them in a chocolate glaze. I'm planning on trying that sometime soon and will post the recipe and results then.

Here we have one of my favorites, Chocolate Dipped Coconut Macaroons. I used to make these all the time at the catering company I worked at. The recipe is pretty simple too, they are just a little time consuming to make because they are shaped by hand (and I used to make hundreds of these a week). There is a recipe for these, but I have made them so much, I don't even measure anymore. If you would like to make them, here is the base recipe and then you can change as you wish.


Coconut Macaroon


6 T evaporated milk

3 cups flaked coconut

1 egg, beaten


Preheat oven to 375.


Combine all ingredients in mixing bowl. Shape by hand into small balls. Place on a greased baking sheet sprinkled with flour.


Bake for 12-15 minutes or until golden brown. Cool and then dip bottoms in chocolate.


These next goodies where kind of made up on the fly. I had come across a recipe for a Chocolate Ganache Cherry Macaroon Tart, and took parts of it to come up with these Chocolate Cherry Tarts. They were nice, but I don't think they were any one's favorites. Back to the drawing board for these guys.


Here we have Cake Bites that were shaped like little cupcakes. I believe these won hands down as everyone's favorite. I found this recipe on Bakerella's blog, and they have been big hits every time I make them. All you need for these is a cake, some frosting of your choosing and some chocolate for coating. I could give directions on how to make these, but I will give the link to Bakerella's site so you can have exact directions on how to make them. http://www.bakerella.com/cupcake-bites-made-easy/
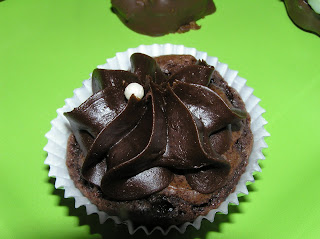


These are Brownies Bites with Chocolate Frosting. You can never go wrong with brownies, and they make up so nice when you do them in mini size.

If your teeth aren't hurting yet from all the sugar, I have one more treat to share with you. For Samantha's school Valentine's Day party, I made sugar cookies for all the kids.


I decided to practise the flooding technique again with these cookies. While the icing was still wet, I added the red dots of royal icing so the dots would blend with the background. They came out nice and I hope all the kids enjoyed them.


Well, there you have it. What I have been doing along with the other post of the past couple weeks. Busy, busy busy. And the next two weeks are going to be more of the same, so stay tune.